Tampilkan postingan dengan label Make Ahead. Tampilkan semua postingan

Sabtu, 15 September 2012

Salmon for a Crowd


Most people like Salmon which makes it the perfect fish for a party or get together. In this recipe the fish is covered with a mustard, tarragon, and chive cream sauce and then roasted in the oven.

The dish can then sit in the fridge for a day and be served with some more sauce at room temperature. I wanted to see on which day the salmon tasted better, so I tried it right as I took it out of the oven and also on the next day. It was even more juicy and tender the next day!


Roast Side of Salmon with Mustard, Tarragon, and Chive Sauce
(bonappetit)
serves 8


⅔ cup mayonnaise
½ cup spicy brown mustard (such as Gulden's)
6 tablespoons chopped fresh tarragon
6 tablespoons chopped fresh chives
2 tablespoons (packed) golden brown sugar
2 tablespoons fresh lemon juice
2 teaspoons finely grated lemon peel
1 3 1/2- to 3 3/4-pound whole side of salmon with skin (about 1 1/2 inches thick at thickest part)


Position rack in center of oven and preheat to 450°F.
Line large rimmed baking sheet with parchment paper. Mix first 7 ingredients in medium bowl. Season mustard sauce lightly with salt and generously with pepper. Place salmon, skin side down, on diagonal on prepared sheet. Spoon 1/2 cup mustard sauce atop salmon, then spread over, covering completely. Sprinkle salmon generously with salt and pepper. Roast just until salmon is opaque in center, about 15 minutes. Using parchment as aid, transfer salmon to platter. Cut crosswise into pieces and serve with remaining mustard sauce.

Selasa, 11 September 2012

Homemade Pita Chips with Olive Tapenade and Greek Salad


Crunchy little Pita Chips are fun to make yourself. Buy some pita bread, cut it in wedges, brush it with olive oil and sprinkle with your favorite seasoning (thyme, sea salt, majoram, paprika, etc). Bake it at 375 for 10 to 15 minutes until golden brown. Serve the pita chips with Olive Tapenade, Hummus or a fabulous greek salad and you'll have a great snack, or lunch, or dinner....


Greek Salad
(from Ina Garten)

Ingredients

  • 1 hothouse cucumber, unpeeled, seeded, and sliced 1/4-inch thick
  • 1 red bell pepper, large-diced
  • 1 yellow bell pepper, large-diced
  • 1 pint cherry or grape tomatoes, halved
  • 1/2 red onion, sliced in half-rounds
  • 1/2 pound feta cheese, 1/2-inch diced (not crumbled)
  • 1/2 cup calamata olives, pitted

For the vinaigrette:

  • 2 cloves garlic, minced
  • 1 teaspoon dried oregano
  • 1/2 teaspoon Dijon mustard
  • 1/4 cup good red wine vinegar
  • 1 teaspoon kosher salt
  • 1/2 teaspoon freshly ground black pepper
  • 1/2 cup good olive oil

Directions

Place the cucumber, peppers, tomatoes and red onion in a large bowl.For the vinaigrette, whisk together the garlic, oregano, mustard, vinegar, salt and pepper in a small bowl. Still whisking, slowly add the olive oil to make an emulsion. Pour the vinaigrette over the vegetables. Add the feta and olives and toss lightly. Set aside for 30 minutes to allow the flavors to blend. Serve at room temperature.


Olive Tapenade

1 cup Niçoise olives, pitted
1 cup small green French olives (Picholine), pitted
¼ cup Oven-Dried or sun dried Tomatoes, drained
1 tablespoon capers, rinsed if packed in salt
1 garlic clove
1 anchovy fillet
½ tablespoon chopped fresh basil leaves
½ tablespoon chopped fresh thyme leaves
½ tablespoon chopped fresh flat-leaf parsley leaves
(¼ tablespoon chopped fresh oregano leaves) optional
½ teaspoon chopped fresh rosemary
¼ cup extra-virgin olive oil
1 ½ teaspoons freshly squeezed orange juice


In a food processor, combine all the ingredients except the olive oil and orange juice. Using the pulse button, process until coarsely chopped and well blended. Continue to process, slowly adding the olive oil and orange juice. Refrigerate in a covered container. Use as needed.
Tapenade will keep up to 1 week, refrigerated, in a covered container.

Rabu, 15 Agustus 2012

Melon, Cucumber and Tomato Salad


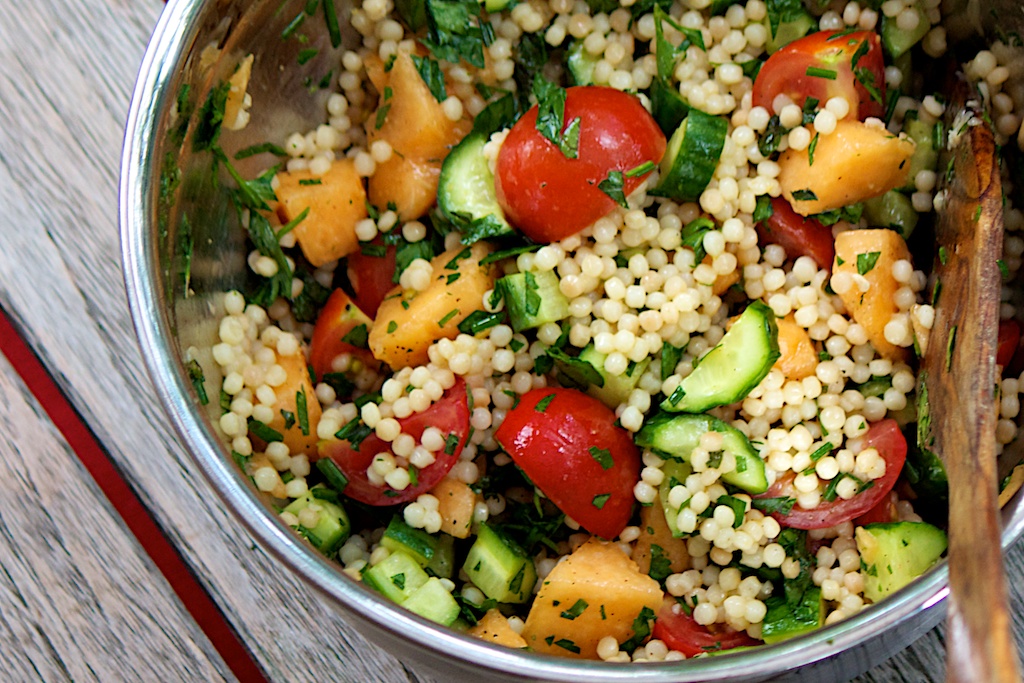
Since it is so hot here in Chicago, we have been eating a lot of salads, cold soups and smoothies. I saw this  recipe in the New York Times and thought it was perfect for the current weather.  Although it might seem unusual to combine melons and cucumbers, they go very well together as this salad proves. To make it more filling, I added some Israelian couscous and we had a very light and refreshing dinner.

Melon, Cucumber and Tomato Salad
(adapted from Martha Shulman)
6 servings


1 European cucumber, peeled if desired and cut in medium dice
Salt to taste
1 pound ripe tomatoes, peeled and seeded if desired, cut in thin wedges or diced
1 small ripe honeydew melon or cantaloupe, peeled and cut into 1-inch dice or shaped into melon balls
2 to 3 tablespoons Champagne vinegar or sherry vinegar
1 tablespoon fresh lime juice
1 teaspoon mild honey, like clover, or agave nectar
4 tablespoons grapeseed oil, rice bran oil or canola oil
1 tablespoon chopped flat-leaf parsley
1 tablespoon chopped fresh mint
1 tablespoon chopped chives

3/4 - 1 cup Israelian Couscous or other grain (optional)
Fresh watercress for garnish (optional)


1. Prepare the couscous according to the packaging directions. Let cool. 
Put the cucumbers in a colander set in the sink or a bowl. Sprinkle with salt and let drain for 30 minutes. Meanwhile, prepare the other ingredients.
2. Toss the cucumbers, tomatoes and melon together in a bowl. Whisk together the vinegar, salt to taste, lime juice, honey and oil and toss with the fruit and vegetable mixture. Add the couscous and mix. Cover the bowl and refrigerate for 1 to 2 hours.
3. Just before serving, toss with the herbs. Line plates with watercress if desired. Taste the salad, adjust the seasonings and serve over the watercress.
Advance preparation: You can make this through Step 2 several hours ahead. Because of the salt, the vegetables and fruit will give off a lot of water, so if you don’t want the salad to be too juicy, salt shortly before serving.
If you are using the couscous, you might have to make more of the dressing. Let your taste buds decide.  

Sabtu, 21 Juli 2012

Marinated Poached Fresh Tuna with Caper and Anchovy Sauce


Are you familiar with vitello tonnato? It is composed of cold, poached veal that is thinly sliced. Then it is layered with a sauce made of canned tuna, mayonnaise, anchovies and capers. It has to marinate for at least 24 hours, during which time the flavors of tuna and veal melt and produce something that is like no other dish of meat or fish in tenderness with a sweet and tangy taste.

This dish is very similiar, only that there is no veal. The tuna is marinated in a citrus vinaigrette and comes together in a snap! It almost melts in your mouth with a light and refreshing citrus flavor.


Marinated Poached Fresh Tuna with Caper and Anchovy Sauce

(from Marcella Hazan)

1 celery rib
1 medium carrot
½ medium onion
¼ cup wine vinegar
Salt
1 lb. fresh yellowfin tuna, cut about 1 inch thick
1 teaspoon finely chopped garlic
2 to 3 flat anchovy fillets, finely chopped
2 tablespoons finely chopped capers
¼ cup fresh lemon juice
⅓ cup extra-virgin olive oil
1 teaspoon mustard
Freshly ground pepper

1. In a deep-sided skillet, combine the celery, carrot, onion, vinegar, a pinch of salt and 1 1/2 inches of water. Turn the heat to moderately high, cover and boil for 10 minutes.

2. Put in the tuna steak; when the water in the skillet returns to a boil, adjust the heat so that it simmers gently. Cover and cook the tuna until it is still pink in the center, 5 to 8 minutes.

3. Meanwhile, in a bowl, combine the garlic, anchovies and capers with the lemon juice, olive oil and mustard. Season with salt and pepper and beat with a fork to combine.

4. Remove the tuna from the skillet and pat dry. Slice it 1/2 inch thick.

5. Choose a deep glass or ceramic dish that can contain the tuna in a single layer. Lightly spread some of the sauce over the bottom of the dish. Put in the tuna slices, laying them flat, and cover with the remaining sauce, spreading it evenly. Cover the dish with plastic wrap and let the tuna stand at room temperature for 6 to 8 hours.


Kamis, 12 Juli 2012

Two Cold Summer Soups

Today I have two cold soups for you. The first one is a White Gazpacho.
I have always wanted to try a White Gazpacho and my first attempt was a great success with my family. It is so rare that all four of us love a recipe equally but it was just the case with this soup. Light and refreshing, this soup makes a great dish on hot summer days. My soup turned out not to be white, but light green because I used small cucumbers and left the skin on.
I let it sit over night and found that the flavor improved over that period of time. Both soups need to be really really cold. So put your serving dishes in the fridge as well before serving the soup.

My second recipe for you is a cold tomato soup from Cooks Illustrated.  Half of the tomatoes are roasted in the oven which gives the soup an intensive sweet and aromatic flavor. There is no bread in this soup. Instead, Olive Oil is added to the pureed tomatoes which thickens the soup and gives it body.
Enjoy these soups on hot summer days and you will wish that summer never ends.


Dovetail’s White Gazpacho
Yield: 4 portions

¼ cup whites of leeks, sliced thin and washed
3 slices white sandwich bread, crusts removed
10 green grapes, washed
¼ cup blanched almond slivers (use Marcona Almonds if you can find them)
1 ½ tablespoons sherry vinegar
2 cups cucumbers
½ cup English cucumbers, peeled and juiced
½ tablespoon sour cream
¼ cup good quality olive oil
2 cups cold water
1 tablespoon salt

1. Cook leeks in a medium-size sauté pan over medium-low heat until translucent and tender, then chill in refrigerator.

2. Combine all ingredients in a blender and purée until smooth. (I soaked the bread for a couple of minutes in the water first before adding everything to the blender.)

3. Season with salt, adjusting amount as needed.

4. Pass through a fine-mesh sieve or chinois.

5. Serve very cold.


CHILLED FRESH TOMATO SOUP


Chilled Fresh Tomato Soup
(Cooks Illustrated)
serves 4

  • 2 lbs. tomatoes, cored
  • 1 shallot, sliced thin
  • 2 garlic cloves, unpeeled
  • 2 teaspoons tomato paste
  • ⅛ teaspoon smoked paprika (optional)
  • Pinch Cayenne pepper
  • Salt
  • 6 tablespoons extra-virgin olive oil, plus extra for drizzling
  • 1 teaspoon sherry vinegar, plus extra as needed
  • Pepper (optional)


To create a chilled tomato soup recipe that produced a dish with complex flavor, we used a combination of fresh and roasted tomatoes. This gave us a dish with bright, tangy freshness as well as a deep, sweet flavor. We also used a small amount of tomato paste and lightly roasted garlic and shallot to boost the chilled tomato soup’s flavor.
1.Adjust oven rack to middle position and heat oven to 375 degrees. Line rimmed baking sheet with aluminum foil and lightly spray with vegetable oil spray.
2.Cut 1 pound tomatoes in half horizontally and arrange cut side up on prepared baking sheet. Arrange shallot and garlic cloves in single layer over 1 area of baking sheet. Roast for 15 minutes, then remove shallot and garlic cloves. Return baking sheet to oven and continue to roast tomatoes until softened but not browned, 10 to 15 minutes longer. Let cool to room temperature, about 30 minutes.
3.Peel garlic cloves and place in blender with roasted shallot and roasted tomatoes. Cut remaining 1 pound tomatoes into eighths and add to blender along with tomato paste; paprika, if using; cayenne; and 1/2 teaspoon salt. Puree until smooth, about 30 seconds. With motor running, drizzle in olive oil in slow, steady stream; puree will turn orange in color.
4.Pour puree through fine-mesh strainer into nonreactive bowl, pressing on solids in strainer to extract as much liquid as possible. Discard solids. Stir in vinegar. Cover and refrigerate until well chilled and flavors have blended, at least 2 hours or up to 24 hours.
5.To serve, stir soup to recombine (liquid separates on standing). Taste and adjust seasoning with salt and vinegar, as needed. Ladle soup into chilled bowls, drizzle sparingly with extra oil, and grind pepper over each, if using. Serve immediately.

Selasa, 26 Juni 2012

Saffron Chicken, Boiled Lemon and Green Bean Salad

I know that I have been posting a lot of salads lately, and yet I have one more that I need to share.. This one is absolutely incredible. One of the ingredients is a cooked lemon peel which is absolutely great with the saffron flavored chicken. Additionally, there are green beans in this salad, but no other ingredients really. Make this salad for your next party and it will for sure be a hit.


Saffron Chicken, Boiled Lemon and Green Bean Salad
(from Ellie Krieger)

Makes 4 servings

1 lemon, preferably unwaxed
1 1/4 teaspoons salt, plus more to taste, divided
Pinch saffron
2 tablespoon finely chopped mint leaves
1 clove garlic, minced
3 tablespoons lemon juice, divided
1/4 cup extra virgin olive oil
1  1/4 pound skinless boneless chicken breast, pounded to 1/2-inch thick
1 pound green beans, washed and trimmed
Cooking spray
2 tablespoon finely chopped fresh thyme leaves
1 tablespoon honey
Freshly ground black pepper

Prick the lemon in 3 or 4 places with a fork and place in a small pot with 1 teaspoon of salt and cover with water. Bring to a boil, cover and simmer for about 50 minutes or until the lemon is very tender. Drain and set aside to cool.

In the meantime, mix the saffron, mint, garlic, 1 tablespoon of lemon juice, 1 tablespoon of olive oil and 1/4 teaspoon of salt in a small bowl. Pour the marinade into a sealable plastic bag, add the chicken and let it marinate while you prepare the other ingredients.

Steam the green beans for 4 minutes and set aside to cool. Cut into 1/2-inch pieces.

Preheat a large skillet or grill pan which has been sprayed with cooking spray. Cook the chicken for 3 to 4 minutes on each side, or until cooked through. Set aside to cool. Cut into bite-sized chunks.

Slice the ends off of the lemon and slice it in half lengthwise. Scoop out the pulp. Slice the peel thinly and then again into 1/4-inch pieces.

In a large bowl, combine the chicken, lemon, green beans and thyme. In a small bowl combine the rest of the lemon juice and the honey, whisk in 1 tablespoon of olive oil, and season with salt and pepper, to taste. Pour the dressing over the salad and toss to combine.

Selasa, 19 Juni 2012

Asparagus Frittata

When the temperatures hit almost 100 degrees here the other day I wanted something light for dinner. Our supermarket had just gotten a delivery of  very fresh asparagus and as the season is almost over I decided to make an asparagus frittata. The original recipe calls for boiling the vegetables. I like them better roasted, so I baked them for 15 minutes in the oven to intensify the flavor and soften them a little.


Asparagus Frittata
(adapted from better homes and garden)


1 ½ lbs. fresh asparagus or two 9-ounce or 10-ounce packages frozen cut asparagus
1 medium yellow sweet pepper, cut into 1/4-inch strips
⅓ cup chopped onion
1 small zucchini, halved lengthwise and sliced 1/4 inch thick (about 1 cup) (I used broccoli instead)
10 slightly beaten eggs
1 cup half-and-half, light cream, or milk
2 tablespoons snipped fresh Italian parsley
1 ¼ teaspoons salt
¼ - 1/2 teaspoon ground black pepper
1/2 - 1 teaspoon smoked paprika
1/4 cup freshly grated parmesan


1. Butter a 2-quart rectangular baking dish; set aside.

2. If using fresh asparagus, snap off and discard woody bases. Scrape off scales, if desired. Cut into 1-inch pieces.

3. In a saucepan, bring about 1 inch water to boiling. Add asparagus, pepper strips, and onion; bring just to boiling. Reduce heat slightly; cover and boil about 1 minute or until crisp-tender. Drain well, reserving some asparagus tips for garnish. . (Here is what I did: Preheat your oven to 350 F. Line a baking tray with aluminium foil and put the prepared vegetables in one layer on the tray. Drizzle with some olive oil and sprinkle with salt and pepper. Bake for 15 minutes or until the vegetables get soft.) Spread asparagus-pepper mixture evenly in baking dish. Layer zucchini (or broccoli) slices over.

4. Combine eggs, half-and-half, parsley, salt, and pepper, parmesan and smoked paprika. Pour over vegetables in baking dish. Bake, uncovered, in a 350 degree F oven about 35 minutes or until a knife inserted near center comes out clean. Let stand 10 minutes before serving . Garnish each serving with asparagus tips, if desired. Serve warm or cold.
Makes 8 servings.

Kamis, 07 Juni 2012

Lentil Mango Salad

Supermarkets are filled with ripe mangos right now and since this recipe paired them with lentils I had to try it.  In Germany, lentils are usually eaten during the winter time, most commonly as soup, stew or maybe as a side dish. I love lentils and I like that you can buy them precooked and ready to serve at many grocery stores. This way you can use them anytime and don't have to wait for them to cook. The mango pairs beautifully with all the spices and the lentils - this salad can be on your table in 15 minutes! I served this dish with a beautiful roasted Moroccan Spiced Salmon.


Lentil Mango Salad
(adapted from Joanne Bruno who adapted it from Simple recipes)
serves 4
1 1/2 cups lentils (I used the "ready to eat" lentils from Trader Joe's)
1 onion, thinly sliced
2 cloves garlic, minced
1 tsp ground cinnamon
1 tsp ground coriander
1 tsp ground cumin
1 tsp dried oregano
1 tsp dried thyme
1 cup tomatoes, skinned and cut into large chunks
1 large mango or 2 small mangoes, peeled pitted and cubed
2 tbsp toasted almonds, chopped
2 tbsp cilantro or parsley leaves
couscous, rice, barley, quinoa, etc. (optional)
Method:
  1. If using uncooked lentils, place lentils in a large pan.  Cover with 2 inches of well-salted water.  Bring to a boil.  Cover, lower heat to a simmer, and cook for 15-20 minutes or until lentils are tender.  Drain.
  2. Heat a large non-stick skillet on medium heat.  Spray with cooking spray.  Stir in the onions and saute until tender, about 5 minutes.  Stir in the garlic, cumin, coriander, cinnamon, cumin, oregano, and thyme.  Cook 2 minutes more.  Gently stir in cooked lentils, mango and  tomatoes.
  3. Lower the heat to low.  Cover and cook for 2 minutes.  Spoon into serving dish.  Sprinkle with chopped almonds and cilantro or parsley.  Serve with grain of your choice.

Selasa, 15 Mei 2012

Mango and Buttermilk Panna Cotta

Panna Cotta is one of my favorite desserts, it is incredibly delicious! It is easy to prepare and you can even make it a day in advance.   This version is made with buttermilk and cream, and the bottom of the glasses are filled with mango puree. I crumbled pistachios and cantuccinis on top of the panna cotta to have a nice, crunchy contrast and the buttermilk gave the panna cotta a very refreshing and light taste.


Mango and Buttermilk Panna Cotta
(adapted from mytartlette.com)
4 servings


  • 1 cup mango puree, (250ml) 
  • 1 tablespoon water, (15gr)
  • 1 ¾ teaspoon powdered gelatin, (4gr)
  • 1 vanilla bean
  • 1 cup heavy cream, (250ml)
  • ¼ cup sugar, (50gr)
  • 1 cup whole buttermilk, (250ml)
  • Optional:
  • Pistachios, coarsely chopped and crumbled Biscottis for decoration

      Kitchen Note from tartelette: for the recipe I used one cup (250ml) of canned mango puree which I know is not available everywhere. According to the National Mango Board, you would need 2 medium sized mango to obtain one cup of puree. You can substitute with any soft fruit reduced to a puree like apricot, peach, pear, etc...

Divide the mango puree evenly among 4 glasses or ramekins. and freeze.

Place the water in a small ramekin and sprinkle the gelatin over it. Let it bloom while you prepare the cream. On a flat surface, cut the vanilla bean in half lengthwise without cutting all the way through. With a pairing knife, scrape the seeds from the pods. Set aside.

In a medium saucepan, heat the heavy cream with the sugar and vanilla bean seeds until the cream is just about to boil, stirring occasionally to make sure the sugar dissolves completely. (note: freshfromevaskitchen: I simmered the cream for 15 minutes in order to get a more intense flavor).

Remove from the heat and stir in the gelatin until it is completely melted. Let cool for about 10 minutes and add the buttermilk. Let cool to room temperature. You can speed up the process by placing your saucepan over a bowl filled with ice but keep and eye on it as it will thicken faster. Once the cream is cooled, slowly pour it over the frozen fruit and let set in the fridge, at least two hours, preferably overnight

Selasa, 24 April 2012

5 Layer Mexican Dip

This 5-Layer Mexican Dip is great for parties or Potluck's. It has a wonderful taste and is so easy to make. It can be prepared ahead of time and will feed a crowd. It is much healthier and much lighter than the regular dips (especially store bought ones) because it doesn't contain all the fatty ingredients found in most of them.


5-Layer Mexican Dip
(from Ellie Krieger)

Ingredients

  • 2 teaspoons olive oil
  • 1 medium onion, diced
  • 2 cloves garlic, minced
  • 1 (15.5-ounce) can black beans, preferably low-sodium, drained and rinsed
  • 1 tablespoon minced chipotle pepper in adobo
  • 4 tablespoons lime juice
  • ¼ teaspoon ground cumin
  • 1 tablespoon water
  • ½ teaspoon salt
  • 2 cups corn kernels (10-ounce box frozen corn)
  • ¼ cup chopped cilantro leaves
  • 2 ripe avocados
  • 4 medium tomatoes, seeded and diced (about 2 cups)
  • ¼ cup thinly sliced scallion
  • 1 tablespoon finely diced jalapeno pepper, optional
  • ¾ cup shredded extra-sharp Cheddar


1.Heat the oil in a skillet over medium-high heat. Add onions and cook until they soften, about 3 minutes. Stir in the garlic and cook for 2 minutes more.

2.Put half of the onion mixture into a food processor with the black beans, chipotle pepper, 2 tablespoons of the lime juice, cumin, water and salt. Puree until smooth. Set aside.

3.Add the corn to the skillet with the remaining onion mixture and cook for about 3 minutes. Remove from the heat and stir in the cilantro leaves.

4.In a small bowl mash the avocado with the remaining lime juice. In a medium bowl toss together the tomatoes, scallion and jalapeno, if using. Season tomato mixture with salt and pepper, to taste.

5.Spread the black bean dip into the bottom of an 8 by 8 glass baking or serving dish. Top with the corn mixture, spreading it out to form a single layer over the beans, repeat with the avocado, then the tomatoes. Top with cheese. Serve with baked chips.

Jumat, 24 Februari 2012

Open Kibbeh

Kibbeh is a middle eastern dish made of bulgur or rice and chopped meat. Usually it looks like a fried croquette and is stuffed with lamb or beef. This however is an open version from Yotam Ottolenghi. When I made it, my kitchen smelled incredible aromatic! You might have thought you were at an Arabian market (not that I have ever been to one, but that's how I imagine it would smell there). Cinnamon, allspice and coriander are used in this dish. The meat mixture is a little spicy because of the chile but also sweet due to the cinnamon and pine nuts.
I assembled the dish the night before and popped it in the oven on the day I wanted to serve it, which worked really well....


  • Open Kibbeh
  • (Yotam Ottolenghi)

  • 125 g / 4.4 oz fine bulgur wheat
  • 90ml / 6 tablespoons olive oil
  • 2 garlic cloves, crushed
  • 2 medium onions, finely chopped
  • 1 green chilli, finely chopped
  • 350 g / 12.3 oz minced lamb (I used a mixture of beef and lamb)
  • 1 teaspoon ground allspice
  • 1 teaspoon ground cinnamon
  • 1 teaspoon ground coriander
  • 2 tablespoons roughly chopped coriander
  • 60 g / 2 oz pine nuts
  • 3 tablespoons roughly chopped parsley
  • 2 tablespoons self-raising flour
  • Salt and black pepper
  • 50 g / 1.8 oz tahini paste
  • 2 teaspoons lemon juice
  • 1 teaspoon sumac


Heat the oven to 180C/350F/gas mark 4. Line a 20cm loose-bottomed cake tin with greaseproof paper. Put the bulgur in a bowl, add 200ml of tap water and set aside for 30 minutes.

Heat four tablespoons of oil in a large frying pan. Sauté the garlic, onion and chilli on medium-high heat until soft, remove from the pan, return it to high heat and add the lamb. Cook for five minutes, stirring, until brown. Return the onion mix to the pan, along with the spices, coriander leaves, salt, pepper and most of the pine nuts and parsley (save some for the end). Cook for a couple of minutes, remove from the heat, taste and adjust the seasoning.

Check the bulgur to see if all the water has been absorbed (strain if not). Add the flour, a tablespoon of oil, a quarter-teaspoon of salt and a pinch of black pepper and, with your hands, work into a pliable mixture that just holds together. Push firmly into the base of the tin so that it is compacted and level. Spread the lamb mix evenly on top and press down. Bake for 20 minutes, or until the meat browns further and is very hot.

Whisk together the tahini, lemon juice, 50ml of water and a pinch of salt – you're after a very thick, yet pourable sauce. Remove the kibbeh from the oven, spread the sauce on top, sprinkle with pine nuts and parsley, and return to the oven. Bake for 10 minutes, until the tahini is just set and the pine nuts are golden. Remove and leave to cool down. Before serving, sprinkle with the sumac and a drizzle of olive oil. Remove the sides of the tin and carefully cut the kibbeh into slices.

Senin, 09 Januari 2012

Nutella Chocolate Tart

January is not really the month for desserts, but I have to tell you about this tart. We were spending some time in Miami over the Holidays and one evening we ordered dessert at a Pizzeria. It was a Nutella Tart and it was so incredibly good- warm, filled with dark chocolate and with a bold Hazelnut taste.  I just had to find a recipe for it! So I started my search and found this tart from Pierre Herme. This tart is delicious because of the three different flavours: on top you have the toasted crunchy Hazelnuts, then a layer of dark chocolate ganache followed by a layer of creamy Nutella.
The tart didn't taste exactly like the one we enjoyed in Miami but it was equally good, so here is the recipe.


Nutella Chocolate Tart 
(Pierre Herme)
For the Sweet Tart Dough (this makes more than you need for this recipe):
2 1/2 sticks, 10 ounces, unsalted butter at room temperature
1 1/2 cups confectioner’s sugar, sifted
1/2 cup, 3 1/4 ounces, lightly packed finely ground almond powder
1/2 teaspoon salt
1/2 teaspoon vanilla bean pulp or pure vanilla extract
2 large eggs at room temperature, lightly beaten
3 1/2 cups all-purpose flour
Note:  You will only neeed 1/4 to 1/3 of the dough that this recipe makes for an 8 3/4 inch tart pan.  The book states that making a large quantity of this dough yields the best results.  I saved the rest in the freezer for another use.
Using a food processor fitted with the metal blade, pulse the butter and process, remembering to scrape down the sides of the bowl from time to time.  Process until the butter is creamy.  Add the sugar and blend well.  Next, add the almond powder, salt, vanilla and process until the mixture is smooth, again scraping when necessary.  Add the eggs and process just until blended.  Add the flour and pulse until the mixture just starts to come together.  Stop as soon as the dough forms moist curds and clumps and starts to gather into a ball.  It is very important not to overwork the dough.  The dough will be very soft and pliable if you’ve done this right.
Shape the dough into a ball and divide it into 3 or 4 pieces:  3 pieces for 10-inch tarts, 4 for 9-inch tarts.  Or, you can shape it into one large ball and cut off as much as you need.  Gently press each piece into a disk and wrap in plastic.  Allow the dough to rest in the refrigerator for at least 4 hours or for up to 2 days before rolling and baking.  The dough can also be wrapped and frozen for up to a month.
To bake:
Butter a tart ring and preheat the oven to 350ºF.  Roll the dough on a lightly floured surface to a thickness between 1/16 to 1/8 of an inch.  Fit the dough onto the bottom and sides of the ring and cut of the excess.  Prick the dough all over with a fork and chill for at least 3o minutes in the refrigerator.
When you are ready to bake the crust, fit a circle of parchment paper or foil into the crust and fill with dried beans or rice.  Bake the crust for 18-20 minutes , until it is just lightly colored.  If it needs more time in the oven, remove the rice/beans and the parchment paper and bake for another five minutes, or until golden.  Transfer the crust to a rack to cool.
For the Filling (Intended for a fully-baked 8 3/4 inch tart shell)
2/3 cup Nutella
4 3/4 ounces bittersweet chocolate, finely chopped
7 tablespoons, 3 1/2 ounces, unsalted butter
1 large egg at room temperature, stirred with a fork
3 large egg yolks at room temperature, stirred with a fork
2 tablespoons sugar
1 cup hazelnuts toasted, skinned and cut into large pieces (half the amount is enough)
Preheat oven to 375ºF.  Spread the Nutella evenly over the bottom of the crust and set aside.
Melt the chocolate and butter in separate bowls over simmering water or in the microwave.  Allow them to cool until they just feel warm to the touch, about 104ºF.
Use a small whisk to stir the egg into the chocolate, gently and taking care not to agitate the mixture.  You don’t want to beat air into the ganache.  Stir in the egg yolks a little at a time, followed by the sugar.  Stir in the warm butter.  Pour the ganache over the Nutella in the tart shell.  Scatter the nuts over the top.
Bake the tart for 11 minutes.  (I baked mine 20 minutes because I wanted it more set in the middle) The center of the tart will still be a little jiggly.  Remove the tart from the oven and slide onto a rack.  Allow the tart to cool for at least 20 minutes  or until it reaches room temperature.

can be made a day ahead
Serves 6 – 8

Rabu, 07 Desember 2011

Pulled Pork

Sometimes I am glad that I am not a real Vegetarian. A while ago I promised my son to make him pulled pork and I finally got around to making it last week. I had to find a recipe that I did not need an outdoor grill for, so I turned to Cooks Illustrated and found just the right recipe. I followed their advice and bought the piece of meat that they recommended. When I took a closer look at it I thought that I might not be able to eat it. It had a lot of fat and did not look appetizing at all. But I stuck to my plan and in the end I was glad I followed the directions. This was a perfect example of comfort food- juicy meat submerged in a sweet and tangy Barbecue Sauce. The recipe is made for 6 - 8 persons and I intended to freeze any leftovers. The next day the leftovers magically disappeared and there was nothing left to freeze...

Plan ahead, this dish is not difficult to make but it does need some time.


Indoor Pulled Pork
(from Cooks Illustrated)

SERVES 6 TO 8

Sweet paprika may be substituted for smoked paprika. Covering the pork with parchment and then foil prevents the acidic mustard from eating holes in the foil. Serve the pork on hamburger rolls with pickle chips and thinly sliced onion. Lexington Vinegar Barbecue Sauce or South Carolina Mustard Barbecue Sauce (see related recipes) can be substituted for the Sweet and Tangy Barbecue Sauce. Alternatively, use 2 cups of your favorite barbecue sauce thinned with ½ cup of the defatted pork cooking liquid in step 5. The shredded and sauced pork can be cooled, tightly covered, and refrigerated for up to 2 days. Reheat it gently before serving.

INGREDIENTS

  • Pork
  • 1cup plus 2 teaspoons table salt
  • 1/2cup plus 2 tablespoons sugar
  • 3tablespoons plus 2 teaspoons liquid smoke (available at amazon.com, if you can't find it)
  • 1boneless pork butt (about 5 pounds), cut in half horizontally 
  • 1/4cup yellow mustard
  • 2tablespoons ground black pepper
  • 2tablespoons smoked paprika (see note)
  • 1teaspoon cayenne pepper
  • Sweet and Tangy Barbecue Sauce
  • 1 1/2cups ketchup
  • 1/4cup light or mild molasses
  • 2tablespoons Worcestershire sauce
  • 1tablespoon hot sauce
  • 1/2teaspoon table salt 
  • 1/2teaspoon ground black pepper

INSTRUCTIONS

  1. 1. FOR THE PORK: Dissolve 1 cup salt, 1/2 cup sugar, and 3 tablespoons liquid smoke in 4 quarts cold water in large container. Submerge pork in brine, cover with plastic wrap, and refrigerate for 2 hours.
  2. 2. While pork brines, combine mustard and remaining 2 teaspoons liquid smoke in small bowl; set aside. Combine black pepper, paprika, remaining 2 tablespoons sugar, remaining 2 teaspoons salt, and cayenne in second small bowl; set aside. Adjust oven rack to lower-middle position and heat oven to 325 degrees.
  3. 3. Remove pork from brine and dry thoroughly with paper towels. Rub mustard mixture over entire surface of each piece of pork. Sprinkle entire surface of each piece with spice mixture. Place pork on wire rack set inside foil-lined rimmed baking sheet. Place piece of parchment paper over pork, then cover with sheet of aluminum foil, sealing edges to prevent moisture from escaping. Roast pork for 3 hours.
  4. 4. Remove pork from oven; remove and discard foil and parchment. Carefully pour off liquid in bottom of baking sheet into fat separator and reserve for sauce. Return pork to oven and cook, uncovered, until well browned, tender, and internal temperature registers 200 degrees on instant-read thermometer, about 1½ hours. Transfer pork to serving dish, tent loosely with foil, and let rest for 20 minutes.
  5. 5. FOR THE SAUCE: While pork rests, pour 1/2 cup of defatted cooking liquid from fat separator into medium bowl; whisk in sauce ingredients.
  6. 6. TO SERVE: Using 2 forks, shred pork into bite-sized pieces. Toss with 1 cup sauce and season with salt and pepper. Serve, passing remaining sauce separately.