Kamis, 07 Oktober 2010

Mustard Tart

This tart makes a wonderful light lunch. The crust is crunchy, the interior surprises with a tasty creamy mustard filling. If you like mustard this recipe is for you. It is delicious hot, warm or lightly chilled, but make sure to use a good, strong mustard.


Gerard's Mustard Tart
(Dorie Greenspan: Around my French Table)

The dough needs to be chilled 3 hours, partially baked and then cooled. I made mine the day before I needed the tart.

  • 3 carrots trimmed and peeled
  • 3 thin leeks white and light green parts only, cut lengthwise in half and washed
  • 2 Rosemary Sprigs
  • 3 large eggs
  • 6 Tablespoons Creme Fraiche or Heavy Cream
  • 2 Tablespoons Dijon Mustard
  • 2 Tablespoons Grainy Mustard
  • Salt and Pepper; White Pepper
  • Recipe Tart Dough, partially baked and cooled (recipe see below - or your own) 
Center the rack in the oven and preheat the oven to 420 Degrees F. Line a baking sheet with a silicone mat or parchment paper.

Cut the carrots and leeks into slender batons or sticks: First cut the carrots lengthwise in half, then place the halves cut side down on the cutting board and cut crosswise in half or cut into chunks about 3 inches long. Cut the pieces into matchsticks don't look svelte enough, cut them lengthwise in half. Cut the leeks in the same way.
Fit a steamer basket into a saucepan. Pour in enough water to come almost up to the steamer, cover, and bring to a boil. Drop the carrots, leeks, and 1 rosemary sprig into the basket, cover, and steam until the vegetables are tender enough to be pierced easily with the tip of a knife, 10 to 15 minutes. Drain the vegetables and pat them dry; discard the rosemary sprig.
In a medium bowl, whisk the eggs together with the creme fraiche or heavy cream. Add the mustards, season with salt an white pepper - mustard has tendency to be salty, so proceed accordingly - and whisk to blend. Taste and see if you want to add a little more of one or the other mustard.

Put the tart pan on the lined baking sheet and pour the filling into the crust. Arrange the vegetables over the filling - they can go in any which way. But they're attractive arranged in spokes coming out from the center of the tart. Top with the remaining rosemary sprig and give the vegetables a sprinkling of salt and a couple of turns of the pepper mill.

Bake the tart for about 30 minutes, or until it is uniformly puffed and lightly browned here and there and a knife inserted onto the center of the custard comes out clean.


Tart Dough

This dough is an all-purpose recipe that produces a not-too rich, slightly crisp crust that is as happy holding pastry cream for a strawberry tart as it is encasing a creamy cheese filling for a quiche. This is a good dough to use anytime you see a recipe calling for a pate brisee

Be prepared: This dough should chill at least 3 hours.
  • 1 ¼ cups all-purpose flour, (170 g)
  • 1 teaspoon sugar
  • ½ teaspoon salt
  • 6 tablespoons very cold unsalted butter, cut into bits, (3/4 stick) (86 g)
  • 1 large egg
  • 1 teaspoon ice water
To make the dough in a food processor:

Put the flour, sugar, and salt in the processor and whir a few times, until the butter is coarsely mixed into the flour. Beat the egg with the ice water and pour it into the bowl in 3 small additions, whirring after each one (Don't overdo it - the dough shouldn't form a ball or ride on the blade) You'll have a moist, malleable dough that will hold together when pinched. Turn the dough out onto a work surface, gather it into a ball (if the dough doesn't come together easily, push it, a few spoonfuls at a time, under the heel of your hand or knead it lightly), and flatten it into a disk.

To make the dough by hand:

Put the flour, sugar,, and salt in a large bowl. Drop in the bits of butter and, using your hands or a pastry blender, work the butter into the flour until it is evenly distributed. You'll have large and small butter bits, and that's fine - uniformity isn't a virtue here. Beat the egg and water together, drizzle over the dough, and, using your fingertips, mix and knead the dough until it comes together. Turn it out onto a work surface, gather it into a ball (if the dough doesn't come together easily, push it, a few spoonfuls at a time, under the heel of your hand or knead it some more), and flatten it into a disk.

Chill at least 3 hours or up to 5 days.
When you're ready to bake the tart shell, butter a 9 - 91/2inch fluted tart pan with a removable bottom (butter it even if it's nonstick).

To roll out the dough:

I like to roll out the dough between sheets of wax paper or plastic wrap or in a lightly floured rolling cover, but you can roll it out on a lightly floured work surface. If you're working between sheets of paper or plastic wrap, lift the paper or plastic often so that it doesn't roll into the dough, and turn the dough over frequently. If you're just rolling on the counter, make sure to lift and turn the dough and reflour the counter often. The rolled-out dough should be about 1/4 inch thick and at least 12 inches in diameter.

Transfer the dough to the tart pan, easing it into the pan without stretching it (What you stretch now will shrink int the oven later.) If you'd like to reinforce the sides of the crust, you can fold some of the excess dough over, so that you have a double thickness around the sides. Using the back of a table knife, trim the dough even with the top of the pan. Prick the base of the crust in several places with a fork.

Chill - freeze - the dough for at least 1 hour before baking.

Center a rack in the oven and preheat the oven to 400 degrees F. Press a piece of buttered foil (or use nonstick foil) against the crust's surface. If you'd like, you can fill the covered crust with rice or dried beans (which will be inedible after this but can be used for baking for months to come) to keep the dough flat, but this isn't really necessary if the crust is well chilled. Line a baking sheet with a silicone baking mat or parchment paper and put the tart pan on the sheet.

To partially bake the crust:

Bake for 20 minutes, then very carefully remove the foil (with the rice or beans). Return the crust to the oven and bake for another 3 - 5 minutes, or until it is lightly golden. Transfer the baking sheet to a cooling rack and allow the crust to cool before you fill it.

To fully bake the crust: Bake for an additional 10 minutes, or until it is an even golden brown. Transfer the baking sheet to a cooling rack and allow the crust to cool before you fill it


TIP:STORING: Well wrapped, the dough can be kept in the refrigerator for up to 5 days or frozen for up to 1 month. Although the fully baked crust can be wrapped airtight and frozen for up to 2 month, I prefer to freeze the unbaked crust in the pan and bake it directly from the freezer - it has a fresher flavor. Just add about 5 minutes or so to the baking time.

Selasa, 05 Oktober 2010

Chicken Pot Pie


Here is the good thing. This Chicken dish is not only fast, but you can top it with almost anything you like. Mashed Potatoes, Biscuits (home made or not), Savory Crumbles, Puff Pastry or just leave it like it is and serve it with Pasta or Rice. Or Bread. Or Potatoes. You get it...

30 Minutes Chicken Pot Pie
  • 2 lbs   Chicken Meat (Thighs or Breast), skinned and deboned
  • ½ cup Flour
  • ½ cup Cream, half & half
  • cups Chicken Stock
  • 1 cup Onion, medium diced, about 1/2 onion
  • 1 cup Celery, medium diced, about 3 small stalks
  • 1 cup Carrots, about 3
  • ½ cup frozen Peas
  • 1 Bay Leaf
  • Worcestershire Sauce
  • ¼ cup White Wine
  • Salt & Pepper
  • 2 Tablespoons Vegetable or Olive oil
In a large, heavy bottomed saute pan, heat the Olive Oil and add the chicken meat. Brown from all size until almost cooked.
Add the cut up vegetables and stir until softened about 5 minutes.

Add the flour to the pan and cook for about 3 - 5 minutes on medium heat. Add the liquids, peas and the bay leaf. Let cook over low heat until the mixture thickens and the chicken is cooked through about 10 minutes on low heat. Stir every now and then so it doesn't stick to the bottom.

Taste with Salt, Pepper, Worcestershire Sauce (lots off)  and Wine.


Minggu, 03 Oktober 2010

Dan Dan Noodles

Another recipe of Jamie Oliver that turned out beautifully...


Dan Dan Noodles
(Jamie's America)


In the western Sichuan province of China, they make this dish in huge buckets that they carry on poles over their shoulders. “Dan” means pole, so these are, quite literally, “pole pole” noodles. It’s a simple dish, full of soft, silky noodles, lovely veg, some great crispy meat and a wonderful hum from the raw garlic. So there is a load of punchy flavours here, and then, of course, you’ve got the Sichuan pepper and the wonderful chilli.
I absolutely love chilli, but this dish is right on the edge of my chilli tolerance. Personally, I think that’s the beauty of it, and you’ve just got to go for it, but by all means halve or quarter the amount of chilli for a mellower dish.
Serves 4
1 beef or chicken stock cube, preferably organic
500g minced beef
2 tbsp runny honey
300g wheat noodles
4 handfuls of mixed green veg (chinese cabbage, sprouting broccoli, bok choy, spinach)
4 cloves of garlic, peeled and finely chopped
3 tbsp dark soy sauce
2 tsp freshly ground Sichuan pepper
5 tbsp good-quality chilli oil (see PS below)
2 spring onions, trimmed and finely sliced
1 lime, quartered, to serve
Crumble your stock cube into a large pan of water and get it on the heat. Add the beef to a dry pan and, on a medium to high heat, keep moving it around until it’s golden and crunchy, about 10-15 minutes. Pour away any excess fat, then add the honey and toss until all the mince is nicely coated. Cook for about 30 seconds, then take the pan off the heat.
Stir your noodles into the boiling stock and move them about so they don’t stick together. Cook according to the packet instructions. Shred your cabbage into 1cm strips, quarter your bok choy and snap up the broccoli spears. When the noodles have 1 minute to go, throw in the prepared greens to blanch them. Drain the whole lot in a colander, reserving a mugful of the cooking water. Tip your noodles, veg and the mugful of water back into the hot pan.
Add your garlic, soy sauce, Sichuan pepper and chilli oil. Give it all a good mix with tongs and divide between 4 bowls. Sprinkle over the crunchy beef (you can reheat this at the last minute if you like), finish with a scattering of spring onions and serve each dish with a lime quarter to squeeze over. A serious noodle dish.
PS To make your own chilli oil, get a handful of mixed dried chillies (as many as you like), toast them in the oven to bring out the flavour, whack them in a food processor with a bottle of groundnut oil and pour back into the bottle. This will keep well in your cupboard for a year.

Jumat, 01 Oktober 2010

Biscotti

One of my favorite books is Bill Yosses "The Perfect Finish". I got it a couple of weeks ago and already made 5 recipes out of it. They all turned out delicious. 
These biscottis are fast, easy to make and you can swap ingredients (I didn't have Pistachios so I used Almonds and replaced the Almond Extract with Vanilla Extract). The dough needs to be chilled at least 4 hours or overnight before baking, so don't forget to start early.


Cherry, Almond, and Pistachio Biscotti
(Adapted from Bill Yosses:The Perfect Finish)
Feel free to add your own touch with a variety of dried fruit, whatever strikes your fancy: apricots, pears, cranberries, blueberries, papaya, or even a mixture.
Storing: Double wrap in plastic and freeze the once-baked log, then slice and re-bake whenever you want them.
  • 1 cup Whole-Wheat Flour, 4 oz, 125 g
  • 1 cup AP flour, 4 oz, 125 g
  • ⅓ cup light brown sugar, 2 oz, 60 g
  • 1 teaspoon Baking Powder, 5 g
  • Pinch Salt
  • 2 large Eggs, 3,4 oz, 96 g, lightly beaten
  • ⅓ cup Milk, 2 oz, 60 g
  • 3 ½ Tablespoons Canola oil or Macadamia Oil, 2 oz, 60 g
  • 2 Tablespoons Honey, 1 oz, 35 g
  • ½ Teaspoon Almond extract, 3 g
  • 1 cup dried Cherry, 4 oz, 125 g
  • ½ cup shelled Pistacios, 1 oz, 30 g
In the bowl of an electric mixer fitted with the paddle attachment, slowly beat to combine the flours, brown sugar, baking powder, and salt. In a separate bowl, whisk together the eggs, milk, oil, honey and almond extract. Add the wet mixture to the dry all at once and beat just enough to bring the dough together. Using a wooden spoon or spatula, fold in the dried fruit and nuts.

Scrape the dough onto a long piece of plastic wrap. Bring one side of the plastic wrap over the dough and roll it into a log 12 inches long and 2 - 3 inches in diameter. Chill the dough until firm enough to slice, at least 4 hours and up to 2 days.


Preheat the oven to 350 F.
Carefully unwrap the dough and transfer the log to a parchment-lined baking sheet. Bake until golden brown, 30 - 35 minutes. Turn off the oven and slide the log onto a wire rack to cool to room temperature.

When the log has cooled, preheat the oven to 325 F. Using a serrated knife, slice the log on a slight diagonal into slices 1/8 to 1/4 inch thick. Arrange the slices close together on the parchment-lined baking sheet and bake for 15 minutes. Transfer the biscotti to a wire rack to cool. Store in an airtight container for up to a week.

Kamis, 30 September 2010

Quick Seafood Stew

This is a beautiful Dinner for Family or Company. The sauce can be prepared in advance and stored in the fridge. 10 minutes before you are ready to serve - just add the fish and/or seafood (you can choose any firm fish you like) and let it cook for a couple of minutes.


Seafood Stew
(Blanchard's Table)

1/4 cup olive oil
4    scallions, thinly sliced
1    large yellow onion, cut in half and thinly sliced
1    red bell pepper, seeded and coarsely chopped
2   14 1/2 oz cans Italian stewed tomatoes (or 1 big can)
2    cups bottled clam juice or fish stock
1    teaspoon dried oregano
1    teaspoon dried basil
12  shrimp, peeled, deveined, and tails left on
12  sea scallops
12  littleneck clams, scrubbed
3/4 pound firm white fish (Swordfish, Mahi Mahi, Cod, etc.)
3   Tablespoons chopped fresh parsley
Salt & Pepper
Parsley

Heat the oil in a large pot over medium high heat, and add the scallions, onion and pepper.
Cook, stirring occasionally, until the onion is golden, about 10 minutes. Add the tomatoes and break them up slightly with a spoon. 

Ad the clam juice, oregano, and basil: then cover and bring to a boil.

Uncover and simmer for 10 minutes, or until slightly thickened.

Add the fish and seafood, cover and simmer until the fish and shellfish are cooked through and the clams have opened, 5 to 10 minutes. Taste for salt and pepper and ladle into shallow bowls. Sprinkle with parsley and serve immediately.

Selasa, 28 September 2010

Banana Bread


This Banana Bread might not be the very fastest I ever made, but I liked the idea of a recipe where you can swap ingredients according to your likings. I made it with Yoghurt instead of the Coconut Milk and I added Walnuts and Chocolate Chips for my chocolate loving son. Don't overbake it or it gets too dry.  A loaf will take about 1 h, a mini loaf about 35 min. and Muffins would take about 25 min.


Lots-of-Ways Banana Cake

(Dorie Greenspan’s “Baking: From My Home to Yours”)


The inspiration to bake a banana cake always seems to strike when a bunch of bananas are mottling on the counter. But just because you’ve got the fruit doesn’t mean you have all the other stuff you need, which is why I created this amazingly flexible cake. No coconut? Skip it. No brown sugar? Use white. No coconut milk? Use milk, buttermilk, sour cream or yogurt. You can serve the cake as a single layer or a double (the recipe makes two layers, plain, frosted, filled or frosted and filled. Take a look at Playing Around for some ideas.


If you make the cake with the ingredients listed first below, you’ll get a consistency that isn’t heavy but not featherweight either. It has enough substance to chew on, but its light enough to entice you to go back for a second serving … or a third.


2 2/3 cups all-purpose flour (360 g)
1 ¼ teaspoons baking soda (7g)
½ teaspoon salt
½ teaspoon freshly grated nutmeg
1 ½ sticks (12 tablespoons) unsalted butter, at room temperature (175 g)
1 cup (packed) light brown sugar (or granulated sugar) (200 g)
¾ cup sugar (165 g)
2 large eggs, preferably at room temperature
1 ½ teaspoons pure vanilla extract
2 tablespoons dark rum or Malibu coconut rum (optional)
About 4 very ripe bananas, mashed (you should have 1 ½ - 1 ¾ cups)
½ cup canned unsweetened coconut milk, regular (stir well before measuring) or “lite” (or whole milk, buttermilk, sour cream, or plain yogurt) (120 g)
1 cup sweetened shredded coconut, preferably toasted (or an equal amount of moist, plump dried fruit, such as currants, raisings, chopped apricots, cranberries, blueberries, or halved cherries, or a combination of coconut and dried fruit)


Getting Ready: Center a rack in the oven and preheat the oven to 350 degrees F. Butter two 9x2-inch round cake pans, dust the insides with flour and tap out the excess. Put the pans on a baking sheet. (I made one loaf and 2 mini loafs out of the recipe)

Whisk the flour, baking soda, salt and nutmeg together. Working with a stand mixer, preferably fitted with a paddle attachment, or with a hand mixer in a large bowl, beat the butter until creamy. Add the sugars and beat at medium speed for a couple of minutes, then add the eggs one at a time, beating well after each addition, followed by the vanilla and rum. You’ll have a beautiful satiny batter. Now lower the speed and add the bananas-the batter will curdle, but that’s fine; it will come together as you add the remaining ingredients. Still on low speed, add the dry and liquid ingredients alternately, adding the flour mixture in three portions and the coconut milk in 2 (begin and end with the dry ingredients). Mix just until everything is incorporated. Switch to a rubber spatula and gently stir in the coconut. Divide the batter evenly between the two pans. Bake for about 45 minutes, or until the cakes are a deep golden brown. They should start to pull away from the sides of the pans and a thin knife inserted into their centers will come out clean. Transfer the cakes to a cooling rack and cool for 5 minutes, then unmold and invert onto another rack to cool to room temperature right side up.


Playing Around
Frosting:
 To frost one layer or to fill and frost both layers, consider Sweetened whipped cream to which you’ve added vanilla, a splash of dark rum or Malibu coconut rum and toasted coconut, Marshmallow frosting (p. 247), Chocolate Whipped Cream (page 457) and just for fun, a crown of chocolate shavings (p. 471) or Bittersweet Ganache (p. 453).


Rum Syrup: If you like the flavor of rum, you can douse the cakes with rum syrup as soon as they come out of the oven (see page 226 for the syrup recipe-give these cakes the same treatment you’d give the Rum-Drenched Vanilla Cakes).


One-Layer Cake: Serve just one layer, lightly sprinkled with confectioners’ sugar or cocoa powder, and accompany it with lightly whipped cream and/or ice cream (chocolate, coconut, vanilla, or coffee) and/or Hot Fudge Sauce (page 465).


Grand Banana Sundae: You can cut one cake into small cubes and make a sundae. Toss the pieces of cake with some cubes of fresh banana and a little rum and top with ice cream, hot fudge sauce and whipped cream. Why not go all the way and add some toasted coconut too?


Senin, 27 September 2010

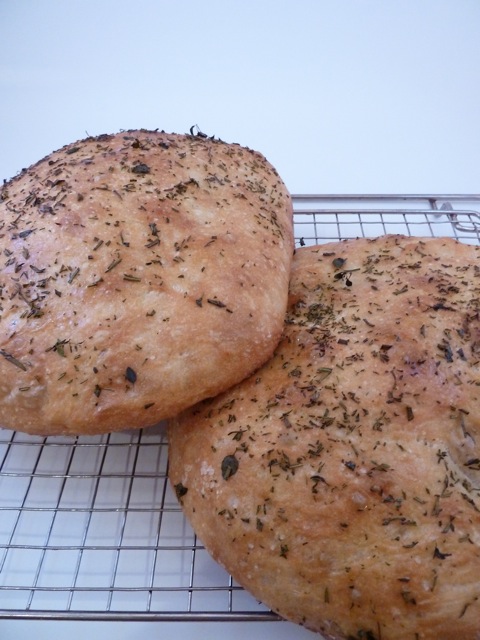
Rosemary Focaccia


I think this is one of the best breads I ever made. The crust is crunchy and
the inside of the bread is tender and full of airy bubbles. This Focaccia is
the reason why I like to bake my own bread so much.
It might seem to be a lot of work, but the dough comes together in a couple
of minutes. You just have to remember to start the Biga the night before you
want to eat the bread. Don't skip this step. The next day all you have to do
is stay at home for the next 3 hours and don't forget to fold and turn every
30 minutes.


Rosemary Focaccia
 From Cook's Illustrated.
makes two 9 inch loaves
If you don’t have a baking stone, bake the bread on an overturned, preheated rimmed baking sheet set on the upper-middle oven rack. The bread can be kept for up to 2 days well wrapped at room temperature or frozen for 2 months wrapped in foil and placed in a zipper-lock bag

  • Biga
  • ½ cup (2 1/2 ounces) unbleached all-purpose flour
  •  cup (2 2/3 ounces) warm water (100-110 degrees F)
  • ¼ teaspoon instant or rapid-rise yeast
  • Dough
  • 2 ½ cups (12 1/2 ounces) unbleached all-purpose flour, plus extra for shaping
  • 1 ¼ cups (10 ounces) warm water (100-110 degrees F)
  • 1 teaspoon instant or rapid-rise yeast
  • Kosher salt
  • 4 tablespoons extra-virgin olive oil
  • 2 tablespoons chopped fresh rosemary
INSTRUCTIONS
1. FOR THE BIGA: Combine flour, water, and yeast in large bowl and stir with wooden spoon until uniform mass forms and no dry flour remains, about 1 minute. Cover bowl tightly with plastic wrap and let stand at room temperature (about 70 degrees) overnight (at least 8 hours and up to 24 hours.) Use immediately or store in refrigerator for up to 3 days (allow to stand at room temperature 30 minutes before proceeding with recipe.)

2. FOR THE DOUGH: Stir flour, water, and yeast into biga with wooden spoon until uniform mass forms and no dry flour remains, about 1 minute. Cover with plastic wrap and let rise at room temperature for 15 minutes.

3. Sprinkle 2 teaspoons salt over dough; stir into dough until thoroughly incorporated, about 1 minute. Cover with plastic wrap and let rise at room temperature 30 minutes. Spray rubber spatula or bowl scraper with nonstick cooking spray; fold partially risen dough over itself by gently lifting and folding edge of dough toward middle. Turn bowl 90 degrees; fold again. Turn bowl and fold dough 6 more times (total of 8 turns). Cover with plastic wrap and let rise for 30 minutes. Repeat folding, turning, and rising 2 more times, for total of three 30-minute rises. Meanwhile, adjust oven rack to upper-middle position, place baking stone on rack, and heat oven to 500 degrees at least 30 minutes before baking.

4. Gently transfer dough to lightly floured counter. Lightly dust top of dough with flour and divide in half. Shape each piece of dough into 5-inch round by gently tucking under edges. Coat two 9-inch round cake pans with 2 tablespoons olive oil each. Sprinkle each pan with ½ teaspoon kosher salt. Place round of dough in pan, top side down; slide dough around pan to coat bottom and sides, then flip over. Repeat with second piece of dough. Cover pans with plastic wrap and let rest for 5 minutes.

5. Using fingertips, press dough out toward edges of pan. (If dough resists stretching, let it relax for 5 to 10 minutes before trying again.) Using dinner fork, poke surface of dough 25 to 30 times, popping any large bubbles. Sprinkle rosemary evenly over top of dough. Let dough rest until slightly bubbly, 5 to 10 minutes.

6. Place pans on baking stone and reduce oven temperature to 450 degrees. Bake until tops are golden brown, 25 to 28 minutes, switching placement of pans halfway through baking. Transfer pans to wire rack and let cool 5 minutes. Remove loaves from pan and return to wire rack. Brush tops with any oil remaining in pan. Let cool 30 minutes before serving.